|
After
the download is complete, run the installer.
The installer is pretty straight forward: just follow the on screen
directions. You can choose the
location of your TGEA directory, but be sure to place it in a sensible location
and remember where it’s installed.
The Directory
Layout, which you should look over immediately, will use relative
paths to avoid confusion if you choose to install TGEA in a non-default
directory.
Installing a C++ Compiler
When
it comes to compilers, you have quite a few choices. For this documentation, we are recommending
Microsoft’s Visual Studio. If you have
the money, you can purchase the full studio suites. Alternatively, Microsoft has started releasing
a line of free compilers referred to as “Express” editions. There are currently two version available,
and while you only need to download one (or have already picked one) setup
for both will be provided.
Installing Visual C++ 2005 Express
Start
by downloading Visual C++ 2005 from Microsoft’s
Website. When visiting the site, you will see multiple compilers for
various languages: C#, Visual Basic, Web Developer, etc. You want to download the Visual C++ IDE:
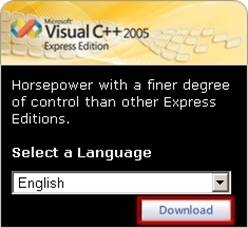
The
download link found on this page is for a web based installation. What his means is that you will download a
small setup file that will download the necessary components and install them
automatically. You can locate the
offline installation, but this will be a larger download and requires DVD
image burning or mounting software.
Keeping it simple, we will stick with the web installation.
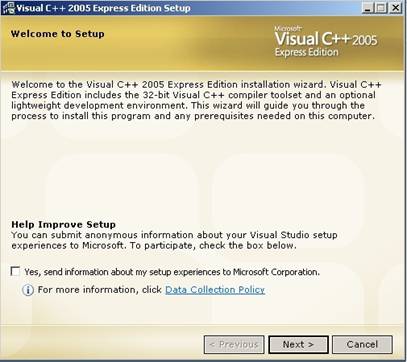
Run
the vcsetup executable to start the process. A few quick dialogs will pop up, preparing
the installer. When the main page
appears, click “Next” to start.
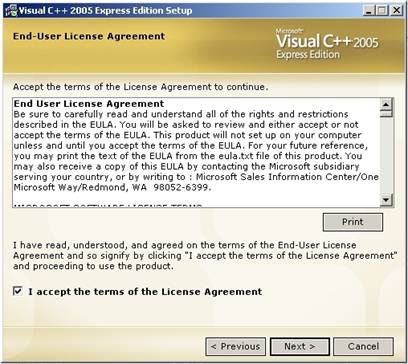
Click
the box to accept the License Agreement and click "Next" to
continue
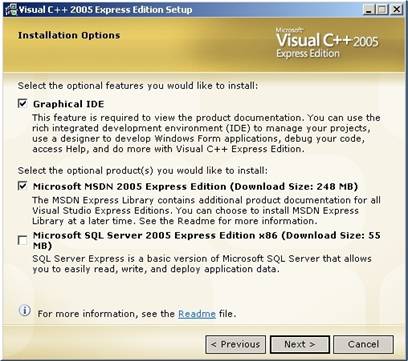
When
the Install Options screen appears, keep the Graphical IDE box checked. It is also highly advised to install the
Microsoft MSDN. While you can access
and online MSDN, it is handy to have an offline version for faster access and
those rainy days when you lose internet access. Click “Next”
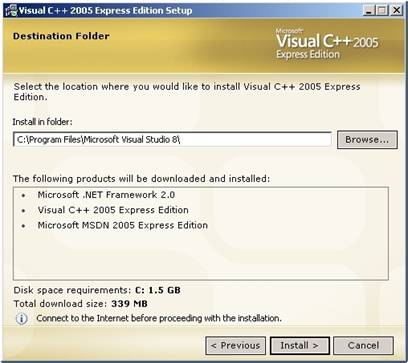
Review
your installation options. It is
recommended you keep the default install directory to avoid confusion later
in development. Click “Install” to
begin the download.
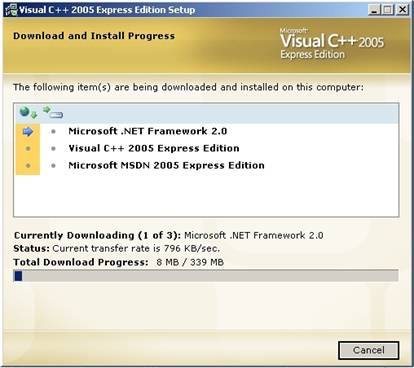
From
here, the installer will download the necessary files. This could take a while, depending on your
connection. On top of the VC compiler
and MSDN, you’ll notice that the application might also download and install
Microsoft .NET Framework 2.0 if you do not already have it in your
system. This is a requirement for
Torque development as well as non-Torque functionality being used by newer
software. This would be a good time to
start looking through other sections of the documentation and tutorials to
start familiarizing yourself with Torque.
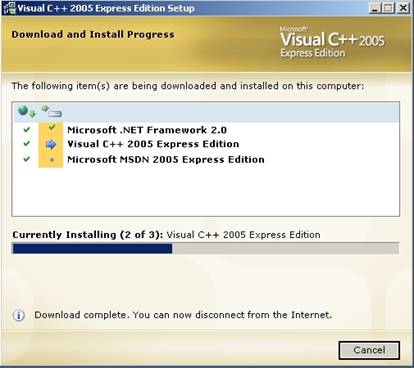
Once
the application has finished downloading the necessary files, it will install
them to your system. Again, depending
on your computer specs, this could take a while. Don’t forget to check the Garage Games website for
updates and resources you might find useful for your game projects.
Once
finished, you will be presented with a completion screen which informs you of
two important notes. One, you have 30
days to register this product. It is
recommended that you go ahead and do so, as it is free and mandatory. The other note lets you know that there
might be updates available for your OS and compiler that correct bugs and
security issues. For each item, click
on the link and follow the site directions for registration and updating.
Click "Exit" on the installer to finish.

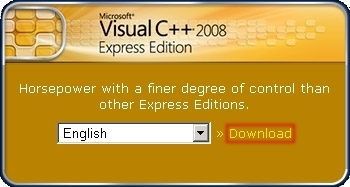
Installing Visual C++ 2008 Express
Start
by downloading Visual C++ 2008 from Microsoft’s Website.
When visiting the site, you will see multiple compilers for various
languages: C#, Visual Basic, Web Developer, etc. You want to download the Visual C++ IDE:
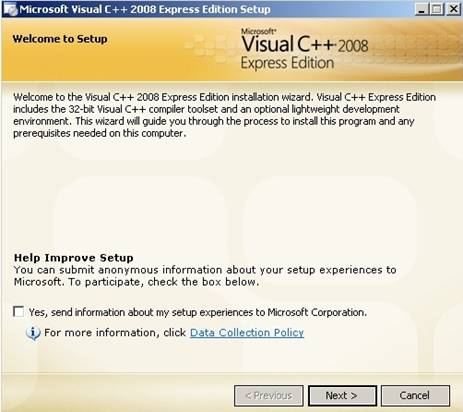
Run
the vcsetup executable to start the process. A few quick dialogs will pop up, preparing
the installer. When the main page
appears, click “Next” to start
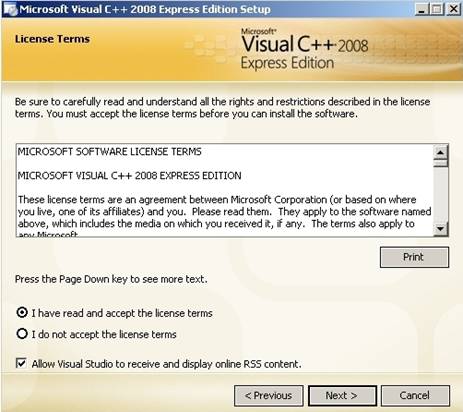
Click
the box to accept the License Agreement and click "Next" to
continue
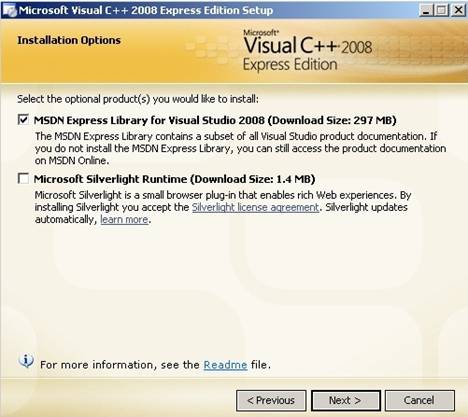
At
the Installation Options screen, it is highly recommended that you enable the
install for the MSDN Express. MSDN is the official documentation from
Microsoft that allows you to look up functions, classes, and variables that come stock with the Microsoft Platform SDK
and C++ language. While you can access
an online MSDN, it is handy to have an offline version for faster access and
those rainy days when you lose internet access.
Review
your installation options. It is recommended you keep the default install
directory to avoid confusion later in development. Click "Install"
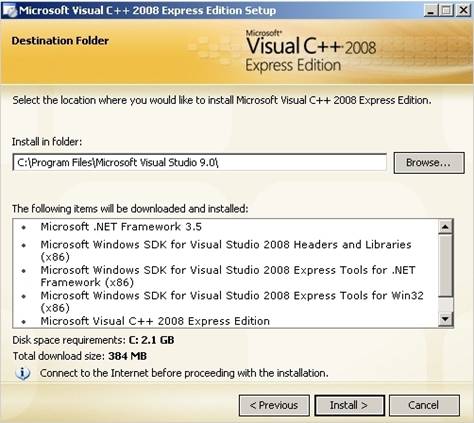
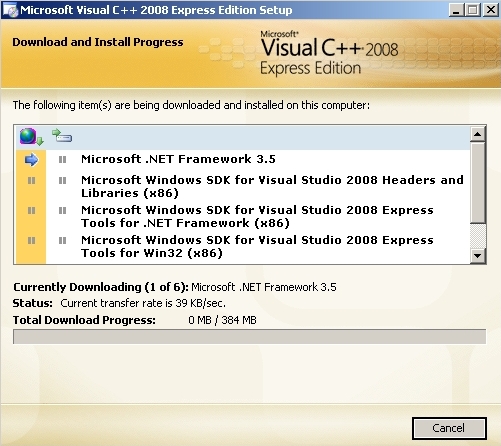
From
here, the installer will download the necessary files. This could take a
while depending on your connection.On top of the VC
compiler and MSDN, you'll notice that the application might also download and
install Microsoft .NET Framework 3.5 if you do not already have it in your
system. This is a requirement for
Torque development as well as non-Torque functionality being used by newer
software. The other downloads consist of libraries and frameworks necessary
for development.
Once
the application has finished downloading the necessary files, it will install
them to your system.
*TODO – INSERT IMAGE FOR INSTALL SCREEN
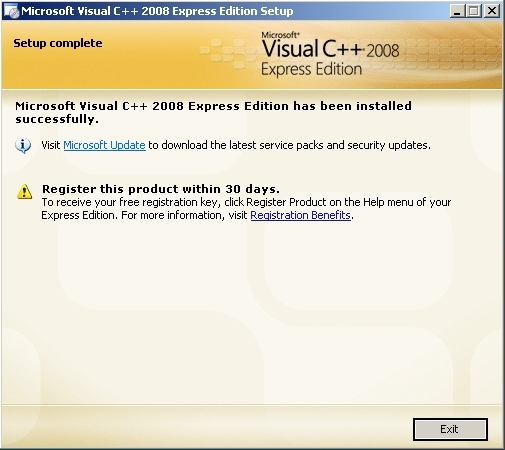
When
finished installing, you will be presented with a completion screen. This screen informs you that you have 30
days to register. It is recommended you go ahead and do so. Click on the link and follow the site
directions for registration. Click "Exit" on the installer to
finish.
Compiling the TGEA SDK source-code
After
you have the source-code downloaded, you'll need to get it compiled.
Compiling TGEA works just like compiling the Torque Game Engine. You can read
below for instructions on compiling with Visual C++ 2005 and Visual C++
2008. The main steps involve
configuring your compiler so it can load Torque and other DirectX projects,
adjusting the windows in the IDE for a better view, and running the builds
(debug and release) from within the compiler.
Configuring your compiler
The
various iterations of Visual Studio and Visual C++ Express share common
dialogs and GUIs. With that in mind,
configuring both VC2005 and VC2008 will be handled in this section. If there is a drastic difference in a step,
GUI appearance, or menu location, two screen shots will be provided: one for
each compiler. Otherwise, one
screen shot will be shown.
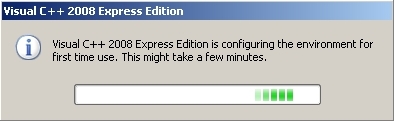
Go
ahead and launch Microsoft Visual C++.
If this is your first run, you will see one-time configuration
performed by the application. The only
difference between the VC2005 and VC2008 is the year shown in the dialog.
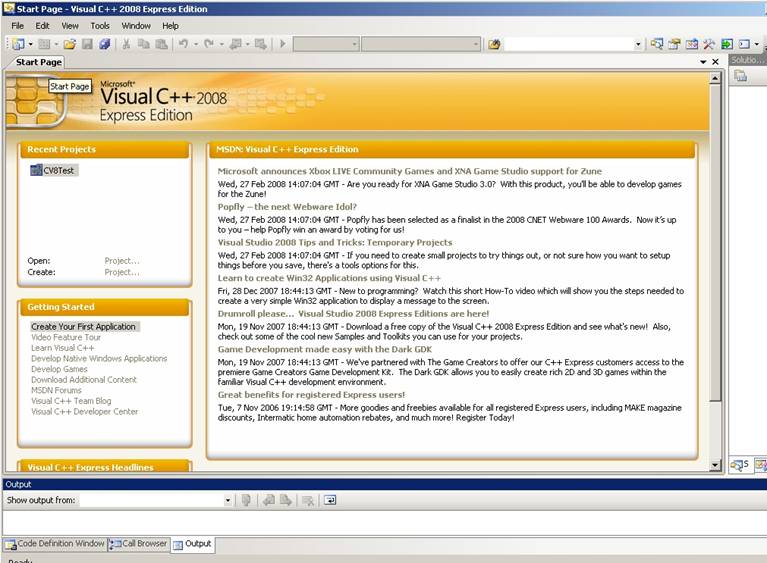
When
the environment loads, you should see a startup screen and some windows which
we will get to later. For now, we are
focused on configuring your compiler
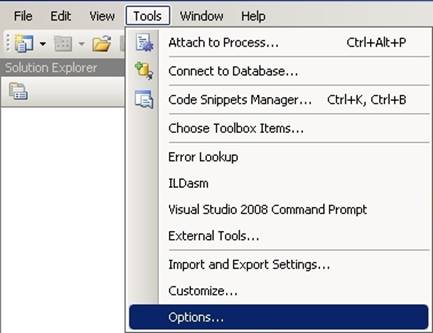
Our
first step is to load VC’s Options.
Within this menu, we can configure the IDE however we want. We can change color schemes, short keys, directories to search for libraries and
headers, etc.
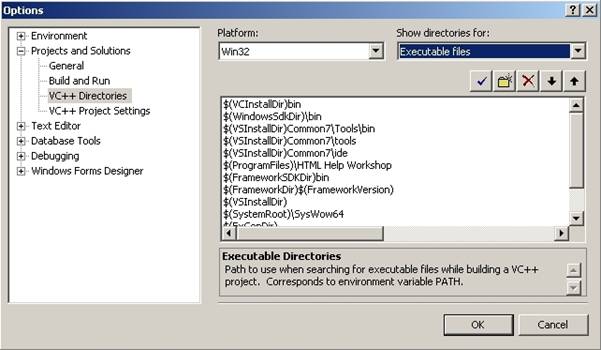
On
the left, you will see a tree of sub-menus.
Navigate down to Projects and
Solutions->VC++ Directories. From here, we tell the compiler where to
look for core headers and libraries we need in order to compiler Torque: namely
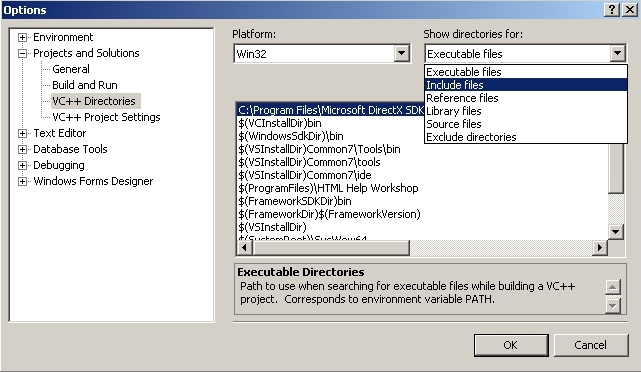
DirectX files. So, let’s start with
adding an executable file. In the top
right, under “Show Directories for:”,
highlight the “Executable files”
option (highlighted in blue in this screen shot)
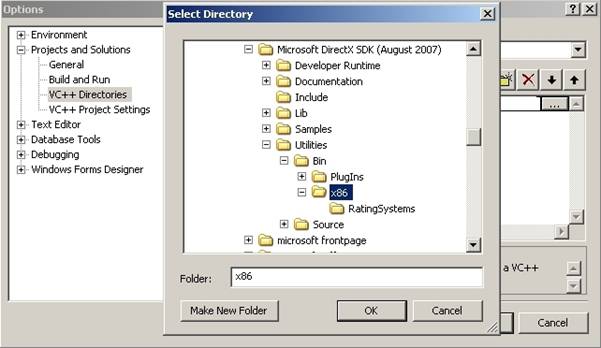
Click
the folder icon between the checkmark and X.
A blank line will insert itself in the list of directories. At the end of that line, you will see a
series of dots […]. Click that button

The
menu that opened is a file browser.
Navigate to the directory you installed DirectX SDK. You need to find the following
subdirectory:
Microsoft
DirectX SDK(Version)/Utilities/Bin/x86/
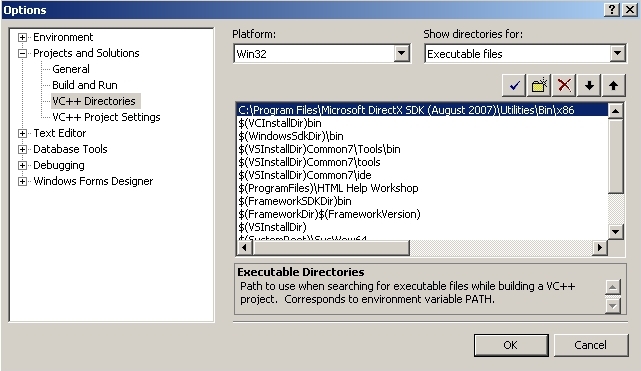
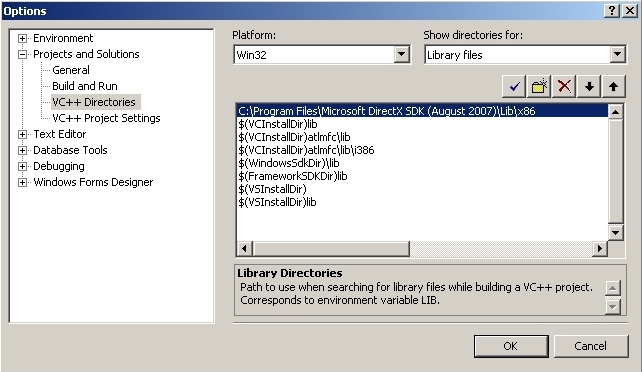
Once
you click “OK,” your directory will be successfully added, as shown below
(your install path might be different):
Next,
we need to add the location of DirectX SDK include files. Change the “Show directories for:” option to “Include Files”. Click the
folder icon to insert a new line.
Click the […] button to
open the file browser. You want to
point to the DX SDK Include directory:
Microsoft DirectX SDK(Version)/Include.
Click
“OK” when you have found the folder.

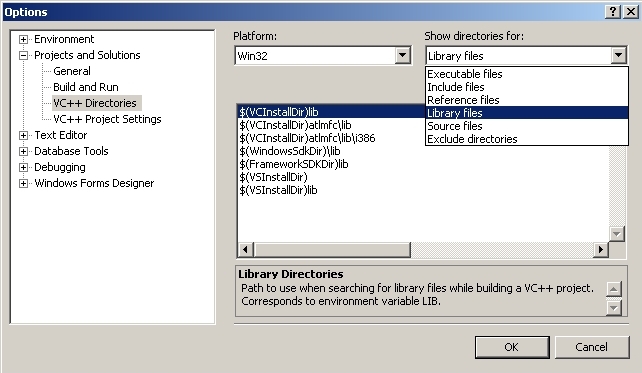
Next,
we need to point to the DX SDK libraries.
Change the directory option to “Library
files”. Click the folder icon to
insert a line, then click the […] button to open the file browser. Point to the following DX Directory:
Microsoft DirectX SDK(Version)/Lib/x86.
Click
“OK” when you have found the folder.
That takes care of the bare minimum, required directories to develop a
DirectX application such as TGEA. Close the options to return to the main VC
window.
These
next few steps are optional, almost aesthetic. You can skip ahead, or read on to learn how
to organize your IDE windows.
Particularly, we need to add an error window to the interface. As developers, we are all bound to insert
code that generates errors. Having a
readily accessible window to show us our mistakes is a good idea.
If
you look in the bottom left hand of the application, you’ll see a set of tabs
similar to the following screen shot:
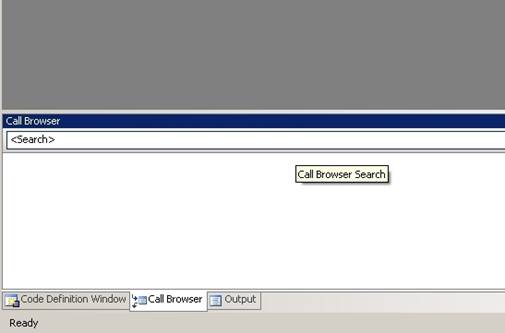
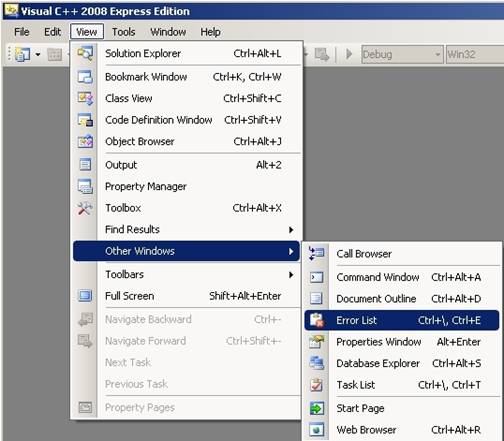
We
need to add another tab that will allow us to quickly access the error
window. Go to the menu bar at the top,
and click on the View->Other
Windows->Error List option.
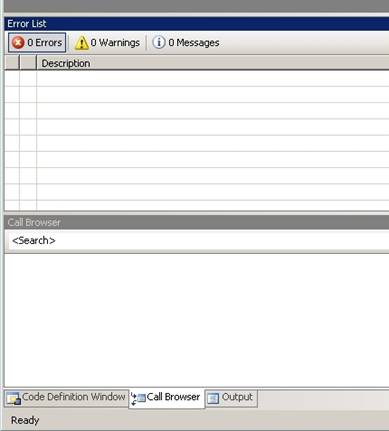
Depending on any other modification you might have made previously, the
Error List window will pop up (usually undocked). As you’ll see below, the window displayed
directly above our bottom set of windows.
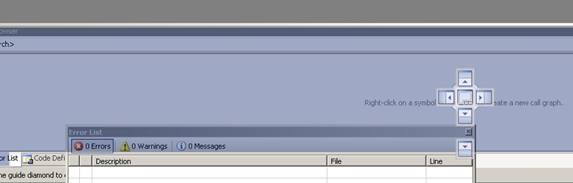
Now,
you can leave this as it is, but you have just lost a decent amount of window
space where your code will be displayed.
You can move that window (or any other window for that matter)
anywhere on the screen, and combine it with existing windows. Click the blue bar on the Error List and
drag it on top of the bottom window. A
blue overlay should appear. Still dragging the window, move your mouse
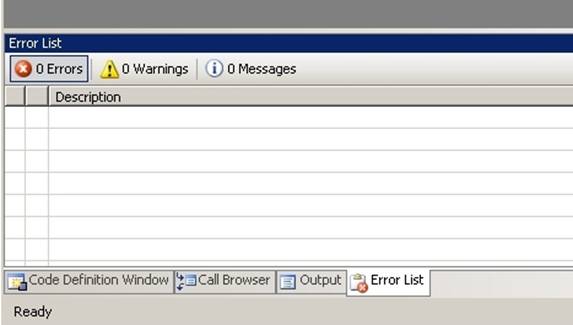
pointer directly over the middle box surrounded by various arrow boxes. When you let go, your Error List window
will be a part of your bottom set.
At this point, if you have not
already looked through the various files and folder structures copied during
the TGEA installation, you may want to have a look through the Directory
Layout section before loading a project and compiling. If you feel comfortable with the location
of your files and where your executables will be generated, go ahead and
proceed with the rest of this section.
Loading a Project
You
will want to load a full TGEA solution (.sln) into
a Visual C++ compiler. Let’s open up
the Stronghold solution. The steps are
the same for all compilers since VC 2003.
This section will use the VC2008 solution and compiler, but if you are
using VC2005 or lower, just navigate to the proper folder.
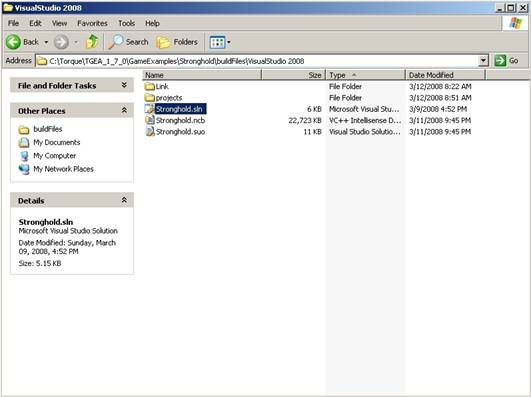
There
are two ways to open the solution. You
can double click on GameExamples/Stronghold/buildFiles/VisualStudio 2008/Stronghold.sln, which in turn
launches VC2008 and automatically loads the solution.
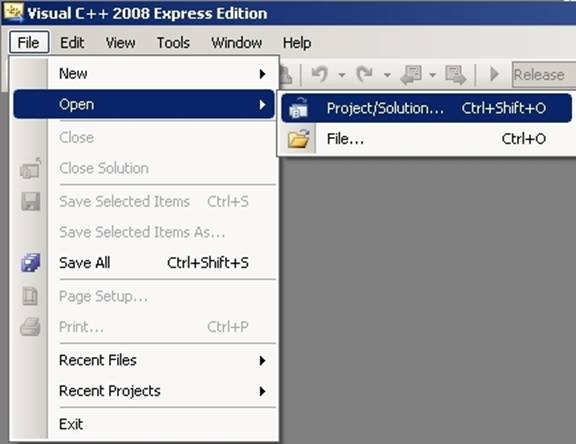
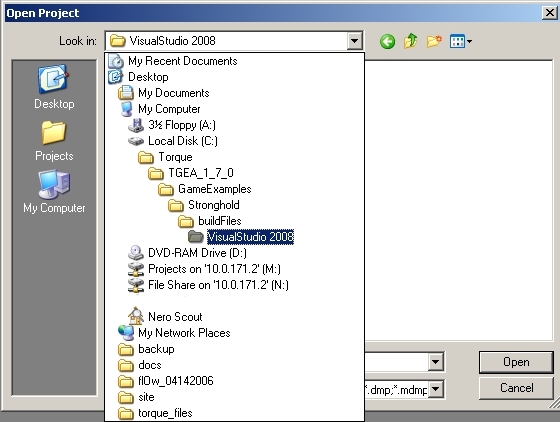
Alternatively,
you can open your compiler first. From
there, you can load the solution through the menu system:

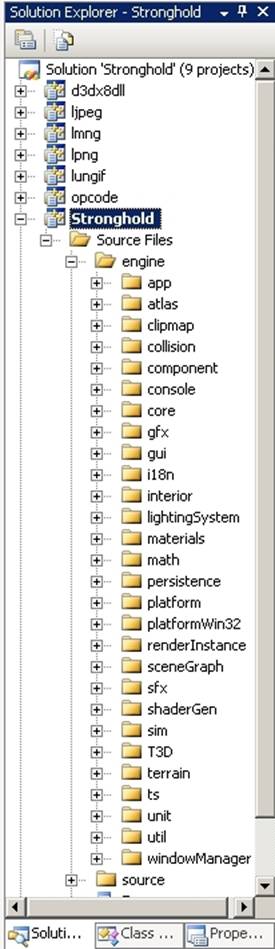
Once the solution loads, your Solution Explorer window will be populated with
the projects that make up the TGEA SDK.
As you can see, on top of your Stronghold game project, there are
other projects in the solution. The
Stronghold project is depends on other libraries to compile and link
properly. Some of these libraries are
generated by the other projects, such as ljpeg, lpng, d3dx8dll, etc.
The solutions provided for you will build the projects in the
appropriate order.
Debug vs Release
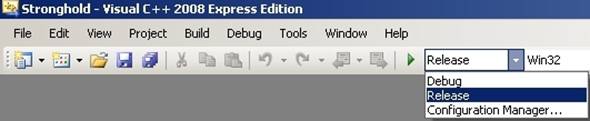
Since
we just touched on the topic, let’s discuss the difference between Debug and Release mode. To switch
between modes, you will want to use the quick menu option:
There
are many differences between the two configurations, but to keep things
general and simple here is a small breakdown:
Debug
executables are larger than Release executables. This is due to the lack of embedded
debugging information in the Release build.
Release
executables are optimized and typically run faster than a Debug build.
While
you can launch both builds from the compiler using the “Start Debugging”
command, only the Debug build will properly use breakpoints and display
debugging information such as variable values, memory addresses, etc.
Be
sure to look through the Torque forums to see how this specifically applies
to TGEA, and also browse through the MSDN for official
Microsoft information.
Building the Solution
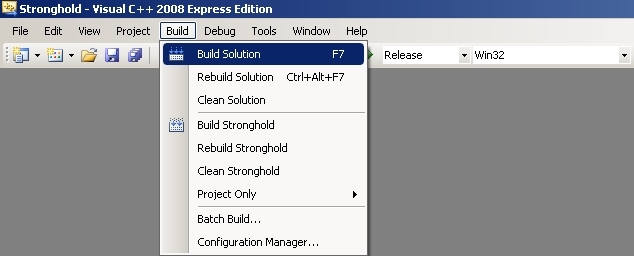
Well,
it certainly took a few steps to get to this point, but we are finally ready
to build. In compiler menu, click on Build->Build Solution (F7)
Fully
building a TGEA solution for the first time can take a few minutes, but you
can keep track of its progress in the Output window:
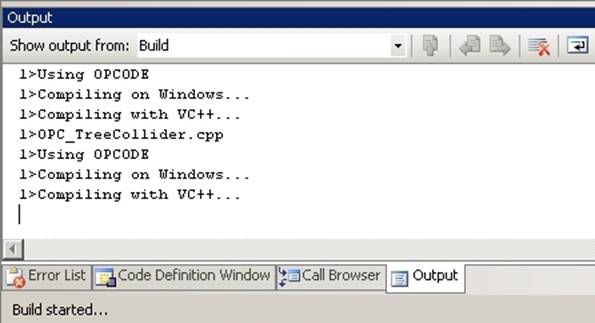
As
you can see, Visual Studio is compiling each project in the solution, and
each code file within. If you happen
to catch any warnings or errors as it scrolls, you can switch to the Error
List window to see what is happening.
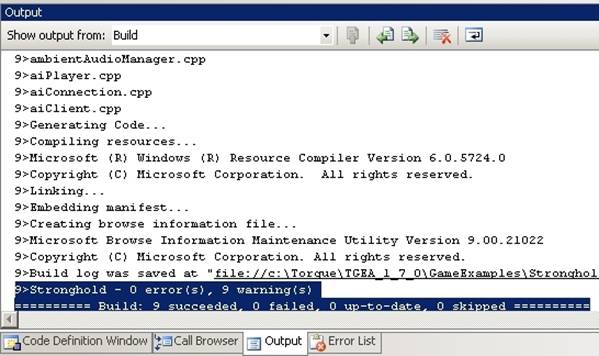
However, a clean build will compile without problems resulting in the
following image:
After
the code compiles, the Visual Studio will begin the Linking process. What’s
happening here is the compiler is combining files together with standard
libraries to produce the executable.
This usually pertains to .libs, .dlls, and .h header files.
Seeing
the “Embedding Manifest” message
is usually your cue to exhale or do a victory dance, as the compiling and
linking processes were a success. The
really important info is highlighted in the above picture: this message will tell you how many
projects were just compiled, how many succeeded, and how many failed.
As
stated earlier, out of the box solutions will result in perfect build. However, if we insert some bad code like
this:
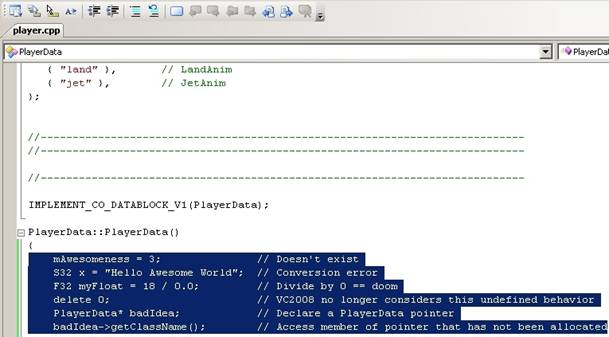
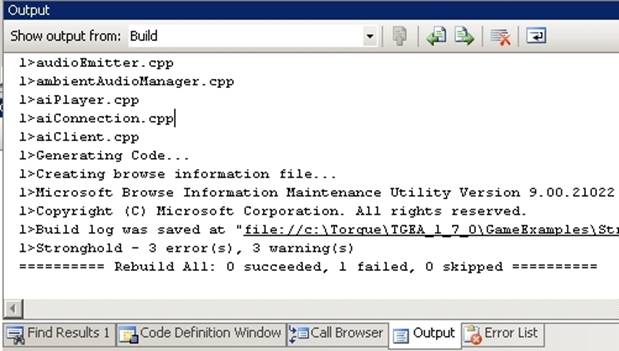
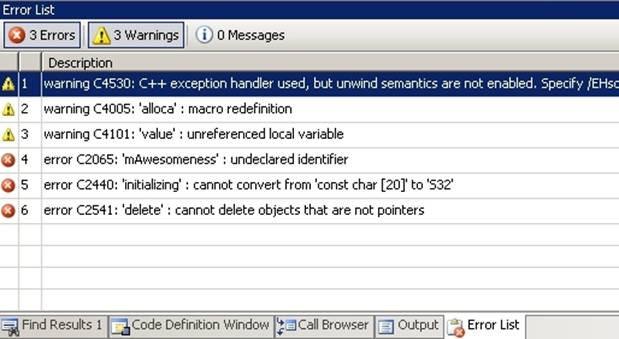
If
another programmer is looking over your shoulder, you will get hit for
writing this code, and you will also see a very angry set of messages in your
Output and Error List windows:
Running the Executable
Do
not put the above code in your solution or make any other modifications just
yet. If you just compiled under the Debug configuration, go ahead and
switch to Release and build (vice
versa if you started with Release). Now, we should run the application to see
if it works.
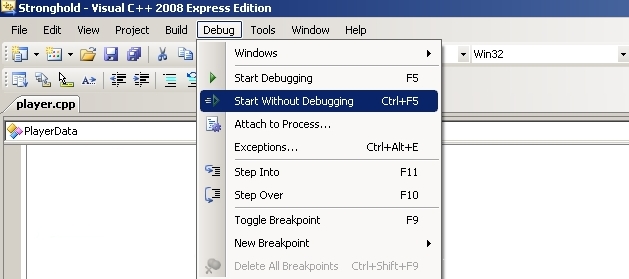
You
can run the executable found in your game directory: GameExamples/Stronghold/game/Stronghold.exe. That’s a standard method for any Windows
program. Let’s do something flashier
and run from the compiler: click on Debug->Start
Without Debugging (ctrl+F5)
If
you have followed all the setup steps found in this Getting Started document, your TGEA application will launch and
you are ready to dive into development.
This
section of the documentation can also be titled “What the heck did I just
download?” A fresh install of TGEA will contain dozens of folders and
hundreds of files. This section will
give you a high level tour of what you are looking at. If you blindly rush into development
without knowing how a Torque project is put together, you may paint yourself
into a corner and have to start over.
Root Directory:
This will be the location you choose to install TGEA. Along with the sub-folders that make up the
SDK, there are a few important files to note.
·
generateAllProjects.bat – Running this batch file will
create all the VC projects listed in the allProjects.txt. After reading in the project list, the file
will generate the projects and solutions and spit them out into the buildFiles folder of each game.
·
allProjects.txt – This file contains a list of
game projects and their locations in the directory.
·
compileAllProjects.bat
– Running this batch file will compile the VC projects listed in the
allProjects.txt
·
syncShrdConsts.bat – Running this batch file will
copy (synch) all projects up with the same shader
constants file (explained later).
Root\Documentation: Here you will find the offline
documents, which you are reading right now. You can open individual pages or
load the whole document.
Root\Engine:
The various sub-folders, files, and libraries found in this directory
make up the core source code of TGEA
Engine\bin: Contains executables useful for
advanced development, doxygen document generation, nasm assembly, etc.
Engine\lib:
Contains the critical libraries for compiling a Torque project. Later in development, if you wish to add
custom 3rd party projects, such as PhysX
or the P5 Glove SDK, this would be a good directory to add the .dlls and .libs to link to.
Engine\Source:
Organized in folders by module, this directory contains all of the
files that make up the TGEA source code.
Once you read a little more documentation and experimentation, finding
what you want will be much easier.
Still, some modules are more self-explanatory than the others. For instance, the “atlas” folder will contain the classes and code pertinent to the
Atlas terrain system.
*Previous Users of TGEA Note*- Some key folders you are used to
coding in have been moved or renamed.
The big one is that the “game”
directory (containing classes for the player, AI, vehicles, camera, etc) has
been renamed to T3D. Newcomers will
want to spend a lot of time in this directory as well.
A
full tour of the engine directory can be found in another section of the
document (place link here when page is complete)
Root\GameExamples:
Each folder within this directory contains a
separate demo, game mod, or prototype.
Each example shows off features that make TGEA stand out. This directory will most likely be where
you want to create your own game folder/project.
GameExamples\AtlasDemo: This game example shows off the blended
Atlas terrain feature and a simple waterblock. Loading this project, viewing the scripts,
editing the mission, etc, will give you a good understanding on how to load
and modify Atlas terrain.
GameExamples\TGEDemoAdvanced: This
demo is a direct port
of TGE's demo. This is a
guided walkthrough of the more prominent Torque tech feature set. Even if this is a guided demo, there are
several key scripts and classes at work: particle systems, camera objects,
weather control, lighting effects, scene manipulation, animation, and more.
GameExamples\Forge: The Forge game mod shows off the prettier
side of Torque. This has been a
conference favorite for a while. Here,
you can view advanced lighting, particles, and shaders at work.
GameExamples\Stronghold: In terms of game play, Stronghold has more
to show than the other mods. This is your basic FPS starter kit. The core Torque systems are in full effect:
networked game play, collision, projectiles, rendering effects (particles,
explosions), environment (Sun, water, terrain), and more. If you want to jump right into developing a
game prototype, modifying the Stronghold game might be the way to go.
GameExamples\T3D:
New TGEA features are shown off in this game example. Before you even jump into the game, you can
change your game character via the "Select Model" option. The mission itself shows off the new
feature of having multiple, tiled Legacy terrains. While not immediately apparent, the
character is reacting to interiors and the terrain using the new Polysoup collision system.
Each example game shares
a common organization theme and folder hierarchy. So, for this next section we are going to
dissect a specific game example and examine how a typical Torque project is
organized. Let’s dig into Stronghold.
Base Directory Files – The three batch files found here
perform useful automated routines that can speed up your development.
·
DeleteDSOs.bat – Deletes
all the .dso files (compiled script code) found in
all sub-directories of the game example
·
DeletePrefs.bat –
Deletes all preference files in all the sub-directories of the game
example. These files usually contain
information such as custom screen resolutions, audio levels, and so on.
·
generateProjects – Will create
your Visual Studio projects and solutions for you. Considering the amount of files, folders,
and libs that make up the TGEA SDK, you definitely
want to use this if you have to develop a game example from scratch
source – This folder will hold
source code specific to your game will be found here. This is entirely separate from the core
source code used by all the game examples.
buildFiles – Each sub-folder found here
contains the projects and solution you can load into your compiler. You obviously want to choose the one
that supports your Visual C++ IDE. The
compile.bat file is a command line application that
will automatically build your solution for you, without opening your compiler If you run the file as it is, or do not
pass arguments to it in the command line, it will automatically build the
VC2005 project. See Compiling
the TGEA
Source Code
for more information.
config – This
directory contains configuration files that are loaded by other
applications For instance, engineDoc.conf is used by Doxygen
to create an engine reference document. project.conf
is used by the generateProjecs.bat to
determine how and what to include in the projects and solutions.
game – The game folder contains
everything that makes up your game: scripts, GUIs, assets, and editors. From here on out, assume we are looking at
folders inside of the game directory.
common – This directory is very similar
to the scriptsAndAssets folder. You will
find scripts, GUIs, and data just like in the scriptsAndAssets
folder, except these are shared amongst all game mods
added to your project. In other words,
you can create a "Survival Horror" folder in the game
directory, which is completely separate from scriptsAndAssets. Both mods will
share the common scripts and folders.
profile – The scripts found in this
directory are used to check your graphics card for compatibility against the
engine. If you do not have a supported
graphics card, or you do not have capable drivers, you will be reminded to
upgrade and update.
shaders – This is the directory
you should store all of your hlsl (high level shader language) files.
Sub-folders are used for organization.
If you have several shaders related to each other, all weather shaders
for example, you can create a folder and store them there.
tools – Your GUI editor, Mission editor, debugger, and other tools/classes will
be located here. These are described
in depth in other sections of this documentation
scriptsAndAssets – The
bulk of your game content is found in this directory. Typically, this directory is broken down
into three sections: client, server, and data.
client – Your client side
scripts and data will be found here.
This usually pertains to logic and GUIs not shared by in a
multi-player game, like an Options Menu or action map script. In Stronghold, scripts and logic
pertaining to input binding, GUI helper scripts, and mission downloading are
stored in "scripts."
GUIs and images can be found in "ui"
data – Anything related to this game
play assets will be found here: 3D models (shapes), environment data (skies,
environment, terrains), audio files (sound).
These are usually sorted by both relevancy and data type. DTS files
used to represent 3D models will be found in the “shapes” folder. DIFF
files which contain building and interior geometry will be found in the “interiors”
folder. OGG and WAV files for sound
effects will be found in the “sound” folder. Have a look around, as the data folder is
pretty straight forward.
server – Server side
functionality and scripts, which every player is affected by in a
multi-player session, are found here.
A large portion of your time will be spent in this directory while
developing your game. This folder
contains the script files used to build the player (player.cs),
AI (aiplayer.cs), weapons (weapon.cs & crossbow.cs),
network connection (game.cs), core game
logic (game.cs), and so on. Individual scripts will be addressed in
later tutorials.
Setting up TGEA can be a lengthy
process, but you want to have a strong foundation and stable system before
you dive into development. From here,
you can go to any other part of the documentation that pertains to what you
want to start developing. There is no
right or wrong starting point beyond this document. However, if you want to go from high level
to low level, this is one recommended path:
Work
with the GUI Editor and
Mission Editor. The drag and drop functionality of these tools
will allow you to experience modifying a game project without performing
extensive script editing.
Study
the Torque
Script documentation to find out what major systems are exposed to the
script language. Take the time to
learn the syntax, how the example games use Torque Script, and try out some
of your own custom code
Start
mixing your script modifications with the components you create with the GUI
and Mission
editors. Following the starter tutorial in the
GUI Editor section is a great example.
Begin
browsing and modifying the engine source code. A great way to learn how to modify the
source code is to download and integrate the free GarageGames Community Resources. Not only will you get new functionality,
but these mini-tours of the engine are invaluable.
Whatever path you decide to take,
there is a mantra that every newcomer to TGEA and novice programmer should
memorize:
“READ. READ CODE. CODE”
Read through this documentation,
and regularly check the forum posts
on GarageGames.com. Read the sample code and resources posted
by others to get an idea of how to modify the engine. Finally, start with simple changes to the
scripts and engines. Expecting to
launch out of the starting gate and creating a MMORPG will only end in
frustration.
|


